Deploy React Web App on AWS S3 and CloudFront using CloudFormation (via AWS SAM CLI)
What are we going to achieve?
In this article, we will walk through a demo project that uses CloudFormation to create a minimum set of cloud infrastructure resources on AWS to host a React web app.
The following diagram illustrates the major components:
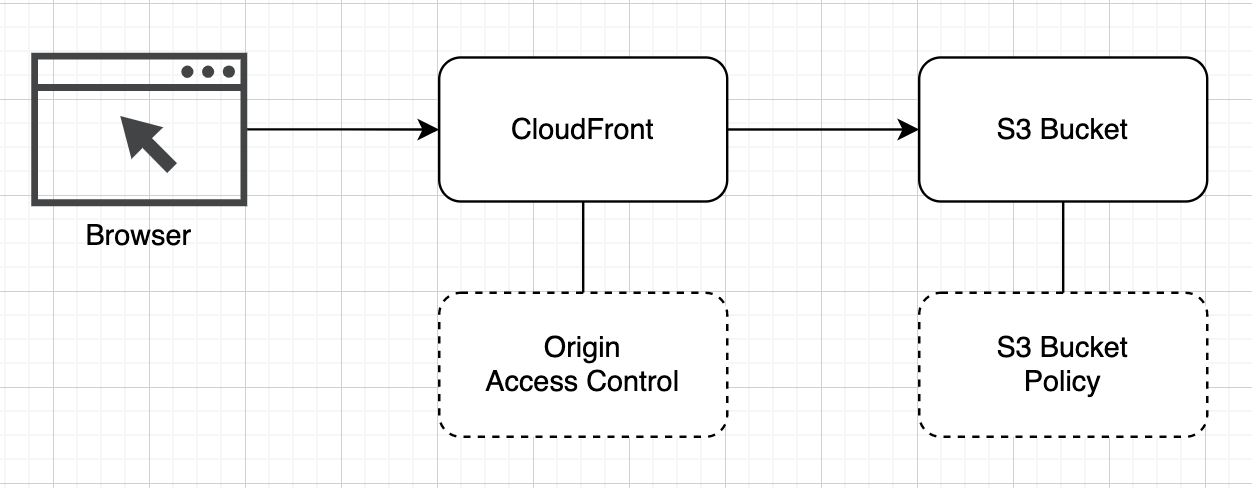
That is, we will store static files (HTML, JavaScript, CSS, etc.) on an S3 bucket and serve these files via CloudFront (HTTPS) with caching.
What are the tools?
CloudFormation
We want to embrace the concept of “infrastructure as code”, which should make the cloud infrastructure setup reliable and repeatable. AWS provides CloudFormation as an official way to create and maintain a group of cloud resrouces as a “stack”.
CloudFormation allows us to write infrastructure code using a declarative and easy-to-read manner. It manages dependencies among resources very well, supports rollback out-of-the-box, and offers many other benefits.
AWS SAM
SAM stands for Serverless Application Model, which also comes from AWS. It consists of an extension of CloudFormation and a command-line tool. While it is designed for serverless applications, it can actually be used to manage and deploy everything CloudFormation supports.
We choose SAM here because the CLI is very convinient, and this choice can support us going further if we want to do more than this minimum setup (e.g., create the API server).
Create React App & TypeScript
They are the frontend tools we choose to get our minimum web app up and running.
Show me the code
The first step is to create the “template.yaml” file which should hold all our infrastructure code:
AWSTemplateFormatVersion: "2010-09-09"
Transform: AWS::Serverless-2016-10-31
Description: >
  SAM Template for React app hosted with S3 and CloudFront

Resources:
  # Our cloud resources will be defined here ...

Outputs:
  # Resource values we'd like to output for convient access ...
Then let’s take a look at the cloud resources we need to create:
- AWS::S3::Bucket
- AWS::S3::BucketPolicy
- AWS::CloudFront::Distribution
- AWS::CloudFront::OriginAccessControl
AWS::S3::Bucket
WebAppS3Bucket:
  Type: AWS::S3::Bucket
  Properties:
    BucketName: !Sub "${AWS::StackName}-web-app-s3-bucket"
    PublicAccessBlockConfiguration:
      BlockPublicAcls: true
      BlockPublicPolicy: true
      IgnorePublicAcls: true
      RestrictPublicBuckets: true
The config above shows how we configure the S3 bucket:
- The logic id of the resource is
WebAppS3Bucket - Bucket name is prefixed with a “stack name” to make it as unique as possible, while
AWS::StackNameis a pseudo parameter provided by CloudFormation - Public access to this bucket is blocked — the contents in this S3 bucket are supposed to be accessed by CloudFront only
AWS::S3::BucketPolicy
WebAppS3BucketPolicy:
  Type: AWS::S3::BucketPolicy
  Properties:
    Bucket: !Ref WebAppS3Bucket
    PolicyDocument:
      Id: PolicyForCloudFrontPrivateContent
      Version: "2012-10-17"
      Statement:
        - Sid: AllowCloudFrontServicePrincipal
          Effect: Allow
          Principal:
            Service: cloudfront.amazonaws.com
          Action: s3:GetObject
          Resource: !Sub "arn:aws:s3:::${AWS::StackName}-web-app-s3-bucket/*"
          Condition:
            StringEquals:
              AWS:SourceArn: !Sub arn:aws:cloudfront::${AWS::AccountId}:distribution/${CloudFrontDistribution}
The code above is the bucket policy configuration required to allow CloudFront to access the Bucket, and it comes from the AWS official guide:
- The logic id of the resource is
WebAppS3BucketPolicy - The policy allows a given CloudFront distribution to read the S3 bucket, while
AWS::AccountIdis a pseudo parameter provided by CloudFormation andCloudFrontDistributionis the logic id defined in the following code
AWS::CloudFront::Distribution
CloudFrontDistribution:
  Type: AWS::CloudFront::Distribution
  Properties:
    DistributionConfig:
      Origins:
        - DomainName: !GetAtt WebAppS3Bucket.RegionalDomainName
          Id: !Sub "${AWS::StackName}-web-app-s3-origin"
          OriginAccessControlId: !GetAtt WebAppOriginAccessControl.Id
          S3OriginConfig: {}
      Enabled: "true"
      DefaultRootObject: index.html
      DefaultCacheBehavior:
        AllowedMethods:
          - GET
          - HEAD
          - OPTIONS
        TargetOriginId: !Sub "${AWS::StackName}-web-app-s3-origin"
        CachePolicyId: 658327ea-f89d-4fab-a63d-7e88639e58f6 # CachingOptimized
        OriginRequestPolicyId: 88a5eaf4-2fd4-4709-b370-b4c650ea3fcf # CORS-S3Origin
        ViewerProtocolPolicy: redirect-to-https
      PriceClass: PriceClass_All
      CustomErrorResponses:
        - ErrorCode: 404
          ResponseCode: 200
          ResponsePagePath: /index.html
        - ErrorCode: 403
          ResponseCode: 200
          ResponsePagePath: /index.html
Basically:
- The logic id is
CloudFrontDistribution - It refers to
WebAppS3Bucketwe defined earlier when configuring the “origin” - It referes to
WebAppOriginAccessControlwe will define later when configure the access to origin - It uses AWS managed cache policy and origin policy
There is one thing requires special care here — CustomErrorResponse: We need to configure two rules that rewire 404 and 403 errors to a 200 success response with index.html.
The reason behind this config is that when using client-side routing solutions such as react-router, CloudFront should give control back to React instead of throwing errors.
For example, when user directly visiting a path such as /about, CloudFront will forward the request to fetch an object named about from the S3 bucket and then returns a 404 or 403 (because the object won’t exist in S3 bucket). However, in a single-page web application powered by React, the true intention of this direct visit is to let React to render content conditionally matching path /about.


AWS::CloudFront::OriginAccessControl
WebAppOriginAccessControl:
  Type: AWS::CloudFront::OriginAccessControl
  Properties:
    OriginAccessControlConfig:
      Name: !Sub "${AWS::StackName}-web-app-origin-access-control"
      OriginAccessControlOriginType: s3
      SigningBehavior: always
      SigningProtocol: sigv4
The last piece to configure is origin access control for CloudFront. This is a standard setting inferred by the AWS official guide.
Please note that many tutorials were setting origin access identity (OAI) instead of origin access control (OAC), which is a legacy setup that AWS no longer recommends.
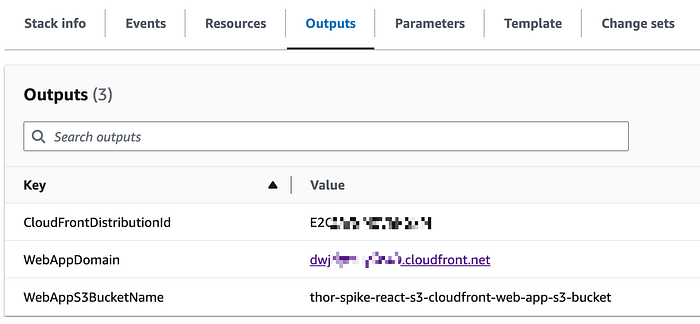
Outputs
Outputs:
  WebAppDomain:
    Value: !GetAtt CloudFrontDistribution.DomainName
  CloudFrontDistributionId:
    Value: !GetAtt CloudFrontDistribution.Id
  WebAppS3BucketName:
    Value: !Ref WebAppS3Bucket
The last bit is to add some “outputs” so that we can easily read the values from AWS console and from a CI pipeline.
# Example of getting CloudFront distribution id
aws cloudformation describe-stacks \
    --stack-name thor-spike-react-s3-cloudfront \
    --no-paginate \
    --no-cli-pager \
    --output text \
    --query "Stacks[0].Outputs[?OutputKey=='CloudFrontDistributionId'].OutputValue"
All in one file
How do we deploy?
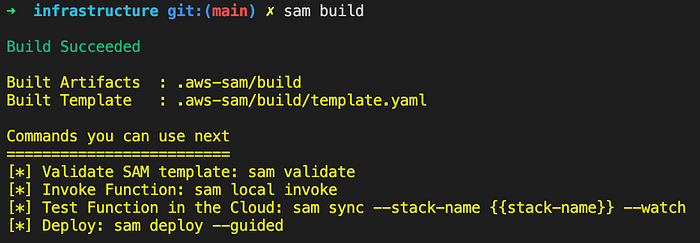
Deploy cloud infrastructure
First, build the template by running sam build:
Second, deploy to AWS.
If it is the first time to deploy manually, it is recommend to use guided deploy:
sam deploy --guidedIt will ask a bunch of questions and generate samconfig.toml file
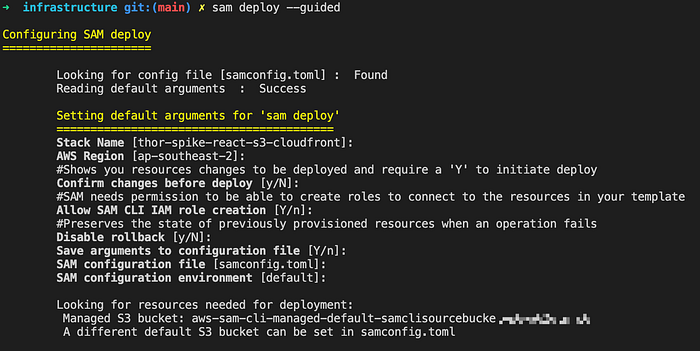
If it is supposed to run in CI/CD pipeline, then we can provide samconfig.toml file directly and run sam deploy without guide.

Deploy React web app
We need to build and bundle the app first via npm run build , this command should generate the bundled files under build folder.
Then we can run the deploy script, which does two things:
- Sync (copy) the bundled files to S3 bucket
- Invalidate CloudFront cache
Code repo
The full code for infrastructure and web app can be found on my Github: https://github.com/zzdjk6/thor-react-s3-cloudfront-sam
More content at PlainEnglish.io.
Sign up for our free weekly newsletter. Follow us on Twitter, LinkedIn, YouTube, and Discord.
Interested in scaling your software startup? Check out Circuit.